Playing music on a Raspberry Pi using UPnP and DLNA (revisited)
What we are aiming for
A music system with a Raspberry Pi plugged in to an amplifier playing music that you choose with your mobile phone. The music can come from MP3s on your phone, from files on your server or from internet radio stations. If there’s more than one Android phone in your household you can have them all synchronised, showing the same playlist and controlling the same music. If you have multiple Raspberry Pis you can put one in each room and choose which one to play the music with. This is all achieved with free software and open standards. I’ve just written some instructions to show how to do it.
Attention!
Edit, 2014-05-11: Please note there are (yet again) updated instructions for installing gmediarender. The rest of this tutorial is still valid though.
With any luck your initial outlay will only be about £45. The end result will be similar to the systems from Sonos and Squeezebox costing loadsamoney. Further additional devices to play music through another Hi-Fi or TV would also be £45.
My earlier post about getting Raspberry Pis to play music using your phone or phones as the controller has been very popular. Since then though the software has developed with new releases of the Debian distribution, gmrender-resurrect and the Raspberry Pi firmware. Taking all these new releases the process is now very much simpler and the sound does not have annoying pops.
What you need
- A Raspberry Pi
- I got mine with a case from ModMyPi for £35
- A wireless USB dongle (or wired ethernet connection near your Hi-Fi)
- I used a N150 Nano USB Wireless Adapter from Maplins for £10
- A micro-USB power supply (most phones use these so you might have one already)
- An SD Card (2GB minimum) - perhaps an old one from a camera?
- An SD Card reader/writer - often built in to a computer
- Your music available on a linux server (e.g. CDs ripped to MP3 files) - this could be replaced with e.g. a NAS device or a Windows machine or just MP3s on your phone
- An amplifier with a 3.5mm auxiliary input and speakers (perhaps a TV sound bar?)
- An audio cable to connect the Pi to the amplifier
- At least one Android device
- Some sort of router / wireless network to connect the media server to the Raspberry Pi
- You might need a USB keyboard and a TV/monitor to do the initial set-up (hopefully you have these lying around)
Setting up a Raspberry Pi to be a UPnP media renderer
The one essential thing is to get gmrender-resurrect (also known as GMediaRenderer, gmrenderer, gmrender, …) installed and working. Once that is done you will be able to play MP3s from your phone through the Raspberry Pi. GMediaRenderer is what is known as a UPnP Media Renderer: that is a destination for media files using the UPnP protocol. There is a lot of software that supports UPnP and many modern “Smart TVs” can also play your music in this way. This is also related to DLNA but I have to confess I don’t understand the interplay between these standards.
Installing the operating system
I started from fresh, downloading the latest “Wheezy” Debian Linux distribution from the Raspberry Pi downloads page. At the time of writing this was 2013-05-25-wheezy-raspbian.zip.torrent. Following instructions on the Raspberry Pi site, I copied it onto an SD Card and turned the RPi on.
Get the Raspebrry Pi on the network
This is one of the more involved parts, which I wrote about last time. It depends on your network basically so have a look at my instructions and use Google to find some more.
First steps and updates
We now have to get everything updated to the latest versions. Note, that these instructions will get the latest software and latest firmware so you might end up with something more recent than me and therefore slightly different behaviour. To see what operating system you have:
Do the initial configuration:
You need to enable ssh access, set your password, set the hostname and reboot.
When I looked at this last time, even with my final solution of using Pulse audio there were annoying pops when music started and stopped. This issue was investigated by the Raspberry Pi developers and has now been fixed in the latest firmware.
To update the firmware to the latest drivers etc, we can use the rpi-update tool:
$ sudo apt-get install rpi-update
$ sudo rpi-update
*** Running ldconfig
*** Storing current firmware revision
*** Syncing changes to disk
*** If no errors appeared, your firmware was successfully setup
*** A reboot is needed to activate the new firmware
$ sudo shutdown -r now
Once the RPi has rebooted you can see what version you have:
$ /opt/vc/bin/vcgencmd version
Jun 17 2013 20:49:11
Copyright (c) 2012 Broadcom
version d380dde43fe729f043befb5cf775f99e54586cde (clean) (release)
Now you need to update all the software. This can take a little while but it’s all automatic:
Installing GMediaRenderer
Attention!
Please note there are (yet again) updated instructions for installing gmediarender.
Log in to your RPi and make sure you are in your home directory. Get a copy of the gmrender-resurrect project from GitHub and enter the new directory that appears:
Henner Zeller has done a great job in fixing bugs and adding features to the old gmrender project and now has a Raspberry Pi himself so has made sure the instructions included with gmrender-resurrect work very nicely. All you have to do now is follow the instructions in the INSTALL.md file (type more INSTALL.md to see them, or see them online at GitHub):
$ sudo apt-get install autoconf automake libtool
$ sudo apt-get install libupnp-dev libgstreamer0.10-dev
gstreamer0.10-plugins-base gstreamer0.10-plugins-good
gstreamer0.10-plugins-bad gstreamer0.10-plugins-ugly
gstreamer0.10-ffmpeg
gstreamer0.10-pulseaudio gstreamer0.10-alsa
$ ./autogen.sh
$ ./configure
$ make
$ sudo make install
$ sudo cp scripts/init.d/gmediarenderer /etc/init.d
If you followed up to that point you will have just copied the “init script” that starts and stops the gmrender service into the /etc/init.d directory where all these scripts live. Henner’s script may need editing for your situation but it is all commented to tell you what to do. I use two Raspberry Pis in two rooms so I just changed the UPNP_DEVICE_NAME to “kitchen” and one to “bedroom”. The init script automatically generates a unique identifier (UUID) for each Raspberry Pi that you use it on so if you use more than one then they won’t clash on your network. If you need to edit the file, use vi or nano to edit the file /etc/init.d/gmediarenderer.
To actually get the operating system to run the init script at the right times we need one more command and then we might as well reboot to test it:
Test that GMediaRenderer is running by listing all the processes with ps and searching the output for gmediarender with grep:
$ ps aux|grep gmedia
2279 ? Ssl 69:52 /usr/local/bin/gmediarender -f Bedroom -d -u bd1dcf3e746aa69812943cb1d00f7ebc --gstout-audiosink=alsasink --gstout-audiodevice=sysdefault --gstout-initial-volume-db=-10
Your output won’t be exactly the same as that but as long as you get something then it’s running.
Setting the default volume
Probably the easiest way to turn the volume up is to run the alsamixer command and press the up arrow cursor until the screen looks like this:
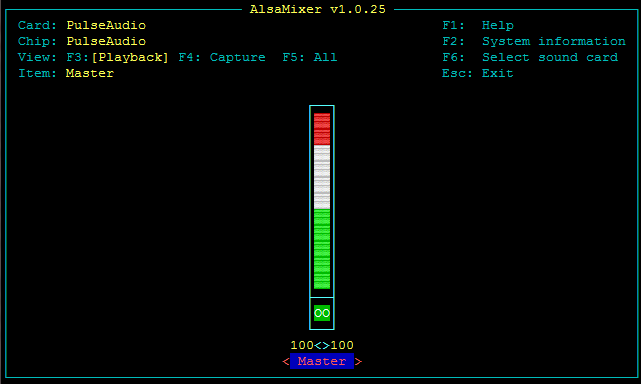
alsamixer on a Raspberry Pi
Press the Escape key to exit. You then need to store that configuration so that it is the default when the machine is turned on:
At this point you should move the Raspberry Pi so that you can plug it in to your amplifier. These instructions assume you are just going to use the 3.5mm stereo audio jack. The sound quality from that is not the best in the world but for many people it is good enough. If you want better then you can buy a USB sound card very cheaply but then the sound configuration will be different and I can’t help you on that (yet).
Checking that ALSA is fine
To summarise this part, I didn’t have to change anything even though it looked like it wasn’t working. I’m not sure what’s going on but I’ve included some diagnostic output here in case it is useful. You can probably skip on to the next section!
Check what the “sysdefault” audio sink is that GMediaRenderer is going to use:
$ aplay -L
null
Discard all samples (playback) or generate zero samples (capture)
default:CARD=ALSA
bcm2835 ALSA, bcm2835 ALSA
Default Audio Device
sysdefault:CARD=ALSA
bcm2835 ALSA, bcm2835 ALSA
Default Audio Device
More information from amixer. This looks suspicious as it says that the playback is “Mono” when we’d expect “Stereo”:
$ amixer
Simple mixer control 'PCM',0
Capabilities: pvolume pvolume-joined pswitch pswitch-joined penum
Playback channels: Mono
Limits: Playback -10239 - 400
Mono: Playback -1862 [79%] [-18.62dB] [on]
Confirm that the correct driver is loaded (bcm2835):
$ lsmod|grep snd
Module Size Used by
snd_bcm2835 16304 1
snd_pcm 77560 2 snd_bcm2835
snd_seq 53329 0
snd_timer 19998 2 snd_pcm,snd_seq
snd_seq_device 6438 1 snd_seq
snd 58447 6 snd_bcm2835,snd_timer,snd_pcm,snd_seq,snd_seq_device
snd_page_alloc 5145 1 snd_pcm
Run a speaker test:
I found this kept testing what it thought was “Front Left” and sending noise out of both speakers. There are files on the RPi that are supposed to play out of only one speaker which should be useful for testing:
I found that both of these came out of both speakers. Another speaker test showed that stereo was possible:
That resulted in sound coming from each speaker in turn! Finally I tried playing two MP3s (left and right) from a useful page and they also worked fine:
$ sudo apt-get install mpg123
$ cd /tmp
$ wget http://www.richardfarrar.com/audio/right.mp3
$ wget http://www.richardfarrar.com/audio/left.mp3
$ mpg123 right.mp3
$ mpg123 left.mp3
Once I found that MP3s were in stereo I finished the rest of the installation and found that music from GMediaRenderer was also in stereo. There’s definitely something wrong but as it doesn’t affect what we want to do I’m leaving it well alone for now.
Using your phone as a controller
To control the music with your phone I use BubbleUPnP for Android. Go to Google Play and install BubbleUPnP. It is a UPnP renderer and control point and also works with the OpenHome protocol (more on that later). In other words, it will play music (and videos and pictures) from the a media server if you have one and can also tell the Pi to play music. The free app has some limitations (not too restrictive) and you can pay £3 to have it unrestricted which is well worth it whether you need to or not if you ask me. Other UPnP controllers exist and are no doubt also available for iPhone but I haven’t tried them.
If you run BubbleUPnP and go to the “Devices” screen then you should see your Raspberry Pi listed under the “Renderers” section along with the “Local Renderer” which is the phone itself. Select the Raspberry Pi. In the “Libraries” section you should see “Local Media Server” which is the files (e.g. music) on your phone and you may see other music libraries as well if you have a media server in the house. To play music from your phone through the Raspberry Pi select the Local Media Server, choose some music from the “Library” screen and get it to play.
If someone else in the house also has BubbleUPnP installed on their phone and configured correctly then you can also choose music from their phone to play on the Raspberry Pi.
Playing music from a media server
I have all my music stored in FLAC and MP3 format on a small Linux computer that is on all the time: this is my “media server”. You may have a laptop or computer with music on which is on sometimes, or a NAS drive with music, or you might put music on a USB disc and plug that into the Raspberry Pi. All these options can be considered to be media servers.
To “serve” the music there must be a computer with software on that understands the UPnP protocol so that the phone can find it and select music from it. When you do this, the phone just tells the Raspberry Pi to fetch the music directly from the media server so it doesn’t all stream via the phone, which is good because it doesn’t suck the battery.
I’ll try to cover some of the options here. There is a big list of UPnP servers on Wikipedia.
Serving music from a Windows computer
I haven’t done this, but there are various options that are known to work:
- Windows Media Player: you probably have this already
- Twonky
- MediaMonkey
- XBMC
- foobar2000
Configure the software and it should appear in the “Libraries” list on the BubbleUPnP “Devices” screen.
Serving music using MiniDLNA on a separate Linux computer
This is what I have: a computer running Linux with the music stored on it. Again, there are many options but I have chosen to use the MiniDLNA software. You can most likely find MiniDLNA in your package manager. For me I did:
Point minidlna at your music files by editing the /etc/minidlna.conf file, e.g.:
# set this to the directory you want scanned.
media_dir=A,/mnt/usbdisc1/music/albums

# set this if you want to customize the name that shows up on your clients
friendly_name=My DLNA Server

# set this if you would like to specify the directory where you want MiniDLNA to store its database and album art cache
db_dir=/var/cache/minidlna
I also had to sudo chown minidlna.minidlna /var/cache/minidlna to get it to work, but YMMV.
The log for minidlna is in /var/log/minidlna.log so to see the latest messages do tail -f /var/log/minidlna.log and use Ctrl-C when you’ve had enough. Sometimes you need to force minidlna to rescan your media files, in which case use sudo service minidlna force-reload.
Serving music using MiniDLNA on the Raspberry Pi
If you have no other computer that is on all the time then you can put your music on a USB hard drive and plug that into the Raspberry Pi. The Raspberry Pi should find the USB drive automatically and mount it, making it available for use (type mount to see what’s available). You will still need to have the UPnP server so follow the instructions above to install MiniDLNA. You will have to set the media_dir config option to point to your USB drive. (Sorry this is a bit brief, I haven’t tried it.)
Serving music using a NAS
If you have a NAS on your network, or you have a Windows computer that is sharing a drive with your music on then you can mount the network drive on your Raspberry Pi and get the music as if it is on a local disc (i.e. follow the previous section). To get the network drive mounted, follow these helpful instructions.
Using multiple synchronised controllers
If you’ve stuck with it so far then you have one or more Raspberry Pis playing music from one or more media servers, all controlled from your phone. If you have more than one Android device in your house then there is one remaining problem that needs to be solved. Each BubbleUPnP controller on a phone can see the music files on the server and can tell the Raspberry Pi to play music but they will be fighting each other with no shared playlist or shared “playing now” indication.
To achieve the situation shown in the video at the start we need to use the OpenHome protocol on top of all the UPnP devices so that all your controllers (phones, tablets) share the same playlist, volume and “playing now” view. To do this we need BubbleUPnP server. Again, there are many places this last piece of software can be installed. There are instructions provided at on the BubbleUPnP server page but I’ll explain a little more. To me it makes most sense to have BubbleUPnP server running on the same machine as the MiniDLNA service.
BubbleUPnPServer on a separate Linux computer
My server runs Ubuntu so all I had to do was:
BubbleUPnPServer on the Raspberry Pi
Firstly install Java:
Then download BubbleUPnPServer, make a place to install it and unzip the package. We’ll also install ffmpeg so that it can transcode files if necessary:
$ cd /tmp
$ wget http://www.bubblesoftapps.com/bubbleupnpserver/BubbleUPnPServer-distrib.zip
$ cd /usr/local/bin
$ sudo mkdir BubbleUPnPServer
$ cd BubbleUPnPServer
$ sudo unzip /tmp/BubbleUPnPServer-distrib.zip
$ sudo apt-get install ffmpeg
The easiest way to get the BubbleUPnPServer running is to use the provided launch.sh script, firstly making it executable:
That second command is running the launch script and sending all its output to /dev/null (which means it doesn’t appear on your terminal). The final “&” means it is run in the background so you get your terminal prompt back. Check it’s running like this:
$ ps aux |grep Bubb
13089 pts/0 Sl 1:18 java -Xss256k -Djava.awt.headless=true -Djava.net.preferIPv4Stack=true -Dfile.encoding=UTF-8 -jar BubbleUPnPServer.jar
13212 pts/0 S+ 0:00 grep --color=auto Bubb
The log file for the service can be found in /usr/local/bin/BubbleUPnPServer/BubbleUPnPServer.log.0 so if you are still in the same directory, typing tail -f BubbleUPnPServer.log.0 will show you the latest messages (use Ctrl-C to stop viewing).
The problem with this approach is that the BubbleUPnPServer process will not start automatically if you reboot your Raspberry Pi so we need an init script for it. Chris Mobberley has written one just for this purpose, but you’ll need to change the DAEMON_PATH definition from /var/www/bubbleupnp to /usr/local/bin/BubbleUPnPServer to be consistent with my previous instructions. I’ve also just posted a more generic guide to init scripts that could be adapted to this case.
Setting up BubbleUPnPServer
Wherever you have installed BubbleUPnPServer you should now have it running. You need to go to the server’s admin web page to configure it. The admin page can be found on port 58050 so in your web browser go to http://hostname:58050 where hostname is the name of the computer running BubbleUPnPServer. If you’ve just installed it on a Raspberry Pi then you might not have a hostname that the web browser recognises. In which case use the Pi’s IP address, finding this as so:
$ ip addr show
1: lo: <LOOPBACK,UP,LOWER_UP> mtu 16436 qdisc noqueue state UNKNOWN
link/loopback 00:00:00:00:00:00 brd 00:00:00:00:00:00
inet 127.0.0.1/8 scope host lo
2: eth0: <BROADCAST,MULTICAST,UP,LOWER_UP> mtu 1500 qdisc pfifo_fast state UP qlen 1000
link/ether b8:27:eb:94:63:30 brd ff:ff:ff:ff:ff:ff
inet 192.168.1.59/24 brd 192.168.1.255 scope global eth0
So in this case the RPi’s address is 192.168.1.59 (under “eth0” as it is plugged in with an ethernet cable) and I need to go to http://192.168.1.59:58050 in my web browser. If you had it on a wireless network then the IP would be under the “wlan0” category.
Once you have the admin page then follow the instructions from the BubbleUPnPServer website. You should see you Raspberry Pi listed in the Media Renderers tab. Tick the box to “Create an OpenHome renderer”.
Using the BubbleUPnPServer
Once you have created the OpenHome renderer then you can use it from your phones. Go back to BubbleUPnP on your phone and go to the “Devices” screen. You should now see you Raspberry Pi there twice, once as before and now also there with “(OpenHome)” after it. If you use this renderer from your phones then all instructions go via the BubbleUPnPServer and all your phones can share the same playlist etc.

BubbleUPnP for Android using OpenHome
Final thoughts
Finally, there is a lot more to the BubbleUPnP client and server that I couldn’t cover here and which isn’t to do with the Raspberry Pi. The client for instance can play music from internet radio stations and from Google Music. You can also set up the server so that you can access it from outside your house and by some clever configuration make it so that if you go to a friend’s house who has a DLNA renderer (lots of TVs do these days) then you can use your phone to tell your friend’s TV to play music from your server!
This solution does not create synchronised music coming from several RPi’s at once. I understand this can be done with Squeezelite (more info here).
If you have Apple devices then you might want to use Airplay, in which case look at shairport.
There is a new protocol called MagicPlay which is an open version of AirPlay. Again, I’ve not tried it but it looks very promising.
Lots of people are doing the same sort of thing. There’s a particularly good post from Mark.
I’m happy to answer questions below, but do read the massive comment thread at the end of the previous post and the Raspberry Pi forum. I’ve tried to address some ALSA issues in another post (though please note that that was with a different Wheezy and firmware version).
Updates:
- 2013-07-22, edit: fixed typo in alsactl command.
- 2013-07-23, edit: included more info on the init script for BubbleUPnP server.
- 2013-08-11, edit: added BubbleUPnP for Android screenshot showing OpenHome.
- 2014-02-20, edit: updated BubbleUPnP server version to 0.8.
- 2014-08-31, edit: updated BubbleUPnP server version to 0.8.3.

Comments
Comments powered by Disqus