Sound configuration on Raspberry Pi with ALSA
While setting up a Raspberry Pi to play streamed music using UPnP, I have had quite a bit of trouble understanding how to configure the sound on my Raspberry Pi. This is partly because I am running it in headless mode (no graphical desktop) and partly because sound on Linux is fiendishly complicated.
Anyway, I am making progress in understanding what’s going on but I am no expert. Here are my findings on how to control the ALSA system from the command line. All I am focussed on here is getting control of the sound output by the 3.5mm stereo socket. If you want to control the output over the HDMI socket or an external USB sound card then you’ll need to do some of your own investigation.
ALSA is the lowest level of the Linux sound stack. The alsa-utils package comes ready installed on the debian wheezy distribution I am using (2012-12-16-wheezy-raspbian.zip). It provides some useful commands: amixer, alsamixer, alsactl, aplay and speaker-test.
Testing
It’s good to be able to test things as you go a long to see what affect configuration changes have. You can do this with the speaker-test command for one, which will by default play white (actually pink) noise out of the speakers. Press Ctrl-C to stop it.
Another command to try is aplay. This command will play WAV files for instance as well as lots of other basic sound file types (but not things with complex compression such as MP3, FLAC, OGG, etc). The Pi comes with some sound files already present, for instance in /usr/share/scratch/Media/Sounds. Try:
To get more information while the sound is playing, use the “-v” and “-V” options, e.g.
That will print a lot of info about the sound file and what device it is being sent to as well as a VU meter as the sound plays.
To see the available devices, use aplay -L. My machine gives this output (since installing PulseAudio):
$ aplay -L
null
    Discard all samples (playback) or generate zero samples (capture)
pulse
    Playback/recording through the PulseAudio sound server
sysdefault:CARD=ALSA
    bcm2835 ALSA, bcm2835 ALSA
    Default Audio Device
It shows that the default device to use is directly to the ALSA device. Interestingly, if I try to play via PulseAudio using aplay with aplay -D pulse then I get a bit of a pop but no sound…
amixer
$ amixer
Simple mixer control 'Master',0
    Capabilities: pvolume pswitch pswitch-joined penum
    Playback channels: Front Left - Front Right
    Limits: Playback 0 - 65536
    Mono:
    Front Left: Playback 65536 [100%] [on]
    Front Right: Playback 65536 [100%] [on]
Simple mixer control 'Capture',0
    Capabilities: cvolume cswitch cswitch-joined penum
    Capture channels: Front Left - Front Right
    Limits: Capture 0 - 65536
    Front Left: Capture 0 [0%] [on]
    Front Right: Capture 0 [0%] [on]
Looking at the top part of the output, we can see that the playback volume for the left and right channels are both at maximum (65536, which is 2^16) and are both unmuted (“on”).
To control these settings we can use the alsamixer command which gives a graphical display (in your terminal) or the amixer command. Let’s look at amixer first:
$ amixer controls
numid=4,iface=MIXER,name='Master Playback Switch'
numid=3,iface=MIXER,name='Master Playback Volume'
numid=2,iface=MIXER,name='Capture Switch'
numid=1,iface=MIXER,name='Capture Volume'
That’s the list of things you can change (control) through the command. We can look at the playback volume in more detail:
$ amixer cget numid=3
numid=3,iface=MIXER,name='Master Playback Volume'
  ; type=INTEGER,access=rw------,values=2,min=0,max=65536,step=1
  : values=65536,65536
This shows the maximum and minimum values for the playback volume and that it is actually a pair of values (for left and right channels). For instance, to change the playback volume we can do:
$ amixer cset numid=3 50%
numid=3,iface=MIXER,name='Master Playback Volume'
  ; type=INTEGER,access=rw------,values=2,min=0,max=65536,step=1
  : values=32768,32768
If you wanted to change the left channel to 50% and the right to 100% for some reason then this command is for you:
$ amixer cset numid=3 50%,100%
numid=3,iface=MIXER,name='Master Playback Volume'
  ; type=INTEGER,access=rw------,values=2,min=0,max=65536,step=1
  : values=32768,65536
To mute the sound you can you control 4:
$ amixer cset numid=4 off
numid=4,iface=MIXER,name='Master Playback Switch'
  ; type=BOOLEAN,access=rw------,values=1
  : values=off
This also affects the volume values on control 3:
$ amixer cget numid=3
numid=3,iface=MIXER,name='Master Playback Volume'
  ; type=INTEGER,access=rw------,values=2,min=0,max=65536,step=1
  : values=0,0
However, the value of the volumes must be stored somewhere because when you unmute it again it restores them.
I have found odd effects when changing the volume while it is muted so best to avoid doing that.
Saving the ALSA state
The operating system saves the ALSA sound configuration when you turn it off and restores it when you turn it on. This is done with the /etc/init.d/alsa-utils script. The state is stored and restored using this file: /var/lib/alsa/asound.state
Once you have the sound configuration as you want it you can store it there using the alsactl command which you have to run with root permissions as it changes a protected file. Let’s set the volume to max, unmute it and store it:
$ amixer cset numid=3 100%
numid=3,iface=MIXER,name='Master Playback Volume'
  ; type=INTEGER,access=rw------,values=2,min=0,max=65536,step=1
  : values=65536,65536
$ amixer cset numid=4 on
numid=4,iface=MIXER,name='Master Playback Switch'
  ; type=BOOLEAN,access=rw------,values=1
  : values=on
$ sudo alsactl store
For me, this gives this changes /var/lib/alsa/asound.state to be:
state.ALSA {
        control.1 {
                iface MIXER
                name 'PCM Playback Volume'
                value 399
                comment {
                        access 'read write'
                        type INTEGER
                        count 1
                        range '-10239 - 400'
                        dbmin -9999999
                        dbmax 400
                        dbvalue.0 399
                }
        }
        control.2 {
                iface MIXER
                name 'PCM Playback Switch'
                value true
                comment {
                        access 'read write'
                        type BOOLEAN
                        count 1
                }
        }
        control.3 {
                iface MIXER
                name 'PCM Playback Route'
                value 2
                comment {
                        access 'read write'
                        type INTEGER
                        count 1
                        range '0 - 2'
                }
        }
}
If we mute it then have another look, line 5 changes to “value -10239”, line 13 changes to “dbvalue.0 -9999999” and line 19 changes to “false”.
If we were to unmute and then set the volume to 50% (as described above) then line 5 changes to “value -1405” and line 13 to “dbvalue.0 -1405” (with line 19 being now set to “true”). Not quite sure where these numbers come from, they are probably the decibel volumes which are logarithmic, but let’s not go there…
If you want to stop the current state being saved when the machine shuts down then you need to disable the alsa-utils init script from running when the machine enters runlevel 0 (halt) and 6 (reboot). A slightly hacky way of doing this is to execute these commands:
$ sudo mv /etc/rc0.d/K01alsa-utils /etc/rc0.d/k01alsa-utils
$ sudo mv /etc/rc0.d/K06alsa-utils /etc/rc6.d/k01alsa-utils
Note that the files have been renamed to have a lowercase “k” at the start. When the machine enters runlevel 0 for instance (it does this when shutting down) all the scripts starting with “K” in the /etc/rc0.d folder are executed. By renaming it to start with a lowercase “k” the file is ignored and the ALSA state is not saved.
alsamixer
As well as using amixer on the command line to change the volumes and so on, you can also use a slightly graphical utility called alsamixer. Just type alsamixer and you’ll get something like the screenshot shown below:
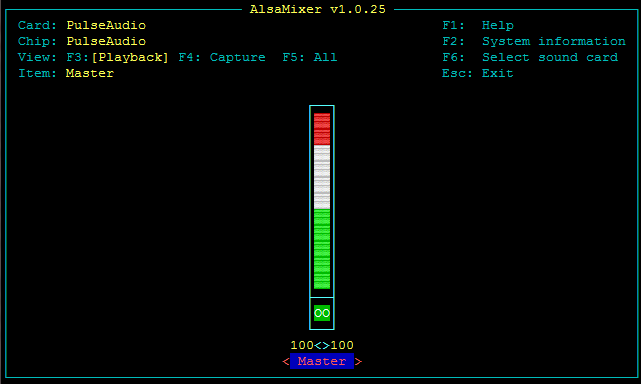
alsamixer on a Raspberry Pi
In this utility you can move the volume up and down using the up and down cursor keys, mute and unmute using the “m” key and move from one device to another (if you have them) using the left and right cursor keys. Press the Esc key to exit. If you play with this and then type amixer once you’ve exited then you’ll see that the changes are reflected in the output of that command as well.
Final thoughts
I hope that’s useful to someone like me who is struggling to understand all this. It is only one part of the stack, so I hope to look into PulseAudio in more detail another time as I think that’s where my problems are at the moment.
One last thing: if you completely mess things up then this command should sort it all out and make things sane again (sets volume to 44% for me):

Comments
Comments powered by Disqus